
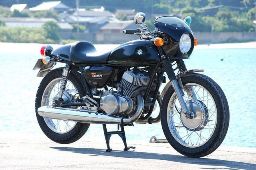
It appears that the previous owner cut the rear half off of the bracket, unsure if this was to give additional clearance for the turnbuckles. I found one on eBay for 15 bucks so will put this on and determine if I can cut off the footpeg mount, leaving the spring bracket and still have adequate clearance for the turnbuckles
- Welcome to 2 STROKE WORLD .net.
2 STROKE WORLD
This section allows you to view all posts made by this member. Note that you can only see posts made in areas you currently have access to.
#1
Turning Wrenches / Re: Rear-set question related to brake return spring
September 20, 2026, 07:59:36 PM #2
Turning Wrenches / Re: Rear-set question related to brake return spring
September 20, 2026, 03:37:21 PM
It looks like the passenger or right side peg mount is on there, but the aft section has been cut off. I can only assume this was done so that the peg mount didn't protrude beyond the rear set, wishing they just would've cut this off and kept the eye intact. I also don't know if this was cut off so that the turnbuckles on the rear sets could move without striking it.
#3
Turning Wrenches / Re: Rear-set question related to brake return spring
September 20, 2026, 09:44:50 AM
Pics of setup
#4
Turning Wrenches / Rear-set question related to brake return spring
September 20, 2026, 09:39:58 AM
I am slowly working on my project bike and am starting to reassemble to make it a roller. The bike has rear-sets on (unsure of the manufacturer but previous owner bought alot of stuff from Gary at Spec II many years back). I looked at the brake spring and the attachment point on the factory mount is not replicated in any means on the rear-sets. Wanted to know if anyone had any slick ideas to fabricate one or had this same situation, how it was resolved? I found a picture of my 1973 I had ~10 years ago and how this was originally mounted. I also took pics of my current setup, was thinking of creating something that mounted on the foot-peg thru hole but wanted to get some ideas first before venturing down this rabbit hole. Further looking at it appears that this was cut off so the right peg would not protrude beyond the rear-set, may be prudent to just get another right side and reconfigure.
#5
Turning Wrenches / Re: RD350 front fender options with larger tires
September 14, 2026, 04:22:18 AM
Much appreciated, The stock fender on mine will not fit over the tire as the integral fork brace "indents" on each side and gets caught on the major diameter of the tire. Quick research of the SR400 fender has the mounting points inline with the fender as it is wider altogether. Thank You
#6
Turning Wrenches / Re: RD350 front fender options with larger tires
September 13, 2026, 06:53:47 PM
Thank you, will reach out to him
#7
Turning Wrenches / Re: RD350 front fender options with larger tires
September 13, 2026, 06:17:11 PM
Thanks again, Is their a certain year or years of the XS650 that fit? I saw a few on Ebay and appears that they have a pretty big range, some are much nicer than others based upon early or later years
#8
Turning Wrenches / Re: RD350 front fender options with larger tires
September 13, 2026, 04:56:12 PM
Thanks for the quick reply. The front tire is a 100/90-18 Pirelli Sport Demon. With regards to the Yamaha XS650 fender, is this a direct bolt on with the integral bracket? Please let me know.
Thanks
Thanks
#9
Turning Wrenches / RD350 front fender options with larger tires
September 13, 2026, 07:51:22 AM
I picked up a project bike and am slowly going thru it (frame). The previous owner utilized the OEM hubs and had new wheels laced in with larger tires. While reassembling the bike, I noticed that the front fender will not fit due to the tire width. I searched the forum and found that Honda CB650 fenders are an option. I wanted to know if anyone had some pictures of their bike with this on it and what year(s) of Honda CB would potentially work or other viable solutions to have a front fender.
#10
Turning Wrenches / Re: Question about tapered steering head bearings
August 30, 2026, 12:09:34 PM
So I have to question, having no threads protruding above the castellated nut and this is acceptable? I know the top of the triple tree captures this with the acorn and compression bolt. I have never seen any threads about this, other than it is taller
#11
Turning Wrenches / Re: Question about tapered steering head bearings
August 29, 2026, 09:14:49 AM
So I did some more investigating and have the following. The lower bearing was fully seated. The OD of the steering head is 1.181" and this bearing hits a 'hard stop with a larger OD. I ended up removing the lower bearing and thru research, is an All Balls kit with a 99-3515 lower bearing and a 99-3509 upper bearing (kit 22-1007). All I can think of is maybe the lower race is not fully seated, I can see a slight parting line (guessing .010" max), the top race is fully seated. I don't think that this .010 is going to give me much more "thread-wise", but I will fully seat it. I have read where these kits protrude ~2 mm higher (John from Economy), but with only 3 threads on the castellated nut before preloading it and when loaded, nothing protruding from the nut this is no good. Most likely going to source an OEM style captured ball bearing kit. Is anyone running this setup and have you experienced similar issues?
#12
Turning Wrenches / Re: Question about tapered steering head bearings
August 28, 2026, 04:30:03 PM
Yeah, I didn't try taking a drift punch or anything and tapping it down further from recollection, I thought the base of that head shaft is a little wider at the bottom but at this point, it can't hurt to see if I can get it to move further down the shaft.
#13
Turning Wrenches / Question about tapered steering head bearings
August 28, 2026, 02:21:59 PM
I picked up a project bike and am going through it as the previous owner started restoring it and never finished. He put new tapered steering head bearing within, unsure of brand or where these were purchased. The issue I have is that when installing the steering head shaft into the frame with the new tapered bearings, I only have about ~3 threads exposed to tighten the large castellated nut with the spanner wrench. Rule is that at least 2 to 3 threads should extend beyond the nut. The races (upper and lower) appear to be fully seated and the lower bearing appears to be fully pressed onto the steering shaft. Any thoughts? I am thinking to remove these and buy new from a known source, any recommendations that do not have this issue?
#14
General Chatter / Re: Sold my bikes, getting out of the game for now- selling off spares
January 25, 2026, 05:17:47 AM
I do not, mainly mechanical engine parts. Thanks for reaching out
#15
General Chatter / Re: Sold my bikes, getting out of the game for now- selling off spares
January 24, 2026, 12:22:54 PM
Replied to your request, let me know if you need anything else