News:

Deals Gap Parking lot triage, looking at sunroofed #2:


This year:  May 5-12th.  25th year!
(CLICK IMAGE FOR MEET INFO)

Main Menu
Menu

Show posts

This section allows you to view all posts made by this member. Note that you can only see posts made in areas you currently have access to.

Show posts Menu

Messages - joseimport

#1
Quote from: teazer on October 12, 2021, 03:13:08 PM
fJ6 were used in RD400E and F in Australia and I think Canada, so you could check the parts list and see if your dealer can get a pair or see if they are available in either of those countries as a Yamaha part.

They are leaner than say 5L1 used in C/D models and richer that 5I4 used in RD350s.  The closest Mikuni needle I found is 5DP7 which is a little leaner and may require larger needle jets or different air jets to get the fuel slope right.

You could measure your OEM needles every 5mm and compare the dimensions to keyster to see how close they are. To do that you can use an optical comparitor or just take a piece of paper and mark a line every 5mm.  Then make sure to tart at the very top in the same place and measure the diameters.

A simpler but less numeric way is to use a set of vernier/digital calipers and close them most of the way up on a needle and then slip the other needle in beside it. If the second needle is smaller diameter it will slide further through the jaws and if it's fatter it will sit higher.  It's fiddly but easy to see if one needle is thicker or thinner than another at any point along its length.


it appears that http://hodaka-parts.com/ finally has them available i just ordered one.
#2
Quote from: SoCal250 on October 09, 2021, 07:05:15 PM
Quote from: Hawaii-Mike on October 09, 2021, 06:35:17 PM
Two thoughts:

- Keyster brass parts are known to be inaccurate compared to original Mikuni.

- Daytona carbs are known to be difficult to work with.  I had a Daytona years ago, talked to the local 2-stroke mechanic, he said to ditch them and go with earlier RD400 carbs.  I did that and jetting was much easier.

True, I stay away from Keyster brass.

He has 2R9 carbs (which are basically the same as 1A1), not 2V0.

its impossible to find 5j6 needles.....  what are my options besides the keyster ones, which are diferently sized.
#3
Quote from: Hawaii-Mike on October 09, 2021, 06:35:17 PM
Two thoughts:

- Keyster brass parts are known to be inaccurate compared to original Mikuni.

- Daytona carbs are known to be difficult to work with.  I had a Daytona years ago, talked to the local 2-stroke mechanic, he said to ditch them and go with earlier RD400 carbs.  I did that and jetting was much easier.

-that's what I have heard from everybody, but the original 5j6 needles are not made anymore and impossible to find, so what are my options? will see how the bike behaves with the keyster ones, only used the needles, all the jets are mikuni.

-its 2r9 carbs not 2vo the g models do not have the emissions stuff of the daytona plus have cdi ignition.
#4
Quote from: Milan on October 12, 2021, 11:23:50 AM
When I put a K & N in my Canadian Daytona, 2R9 carbs,
I had to go with a 160 Main, & #30 Pilot.

So try a #30 pilot.

I may end up with some extra 5J6 needles.
If they ever get here from Ebay purchase.

M


i ordered a set of mikuni pilots 30 and 32.5 just in case

plus 155 and 160 jets

if you can sell me either a set or just one of the 5j6 needles let me know, i would appreciate that.


#5
hey guys i need a little help here on my pilot jetting.

this is my rd400g

https://www.youtube.com/watch?v=_fpOQJUjanM

she's on her  final stages of tuning after a complete rebuild that took almost 5 years.

info on the bike:
-altitude 5250 feet
-2r9 carbs
  • 27.5 pilot jet
  • 150 main jat
  • keyster 5j6 needle (i have the original 5j6 needles but one has lost the anodizing, had to order the closest thing which was a rebuild kit from keyster that has the 5j6 needles from yambits, but they are a little different from the original mikuni, so had to change them both.
-2r9 exhaust
-stock airbox
-squish band on 3j7 heads fixed by chuck quenzler
-crank rebuild by chuck quenzler

the bike starts first kick with the "choke" from cold.

i synched  the carbs as per the manual suggests.

set the idle at 1400ish rpm.

i have been learning about this mikuni carbs, but still learning.
i have been fiddling with the airscrew:
When i close the airscrew totally once warm the bike does not die (should it die?). and it seems to be working better at 0.5 turns out than the 1.5 out its supposed to run.
when i open the screw 3.5 turns out, there is a change and the bike seems to get worse when out, but the difference is only noticed when I give her some throttle, not idleing.
On all positions of the airscrew (0.5 , 1.5 and 3.5 turns out) the bike returns to idle in the same manner.  not faster not slower once revved. probably better when 0.5 out like the video.
in the video the airscrew is set at 0.5 turns out from fully closed which is the one i think works better.
When i quickly open the throttle, there is a little hesitation on the bike to get from 1400 rpms to 2000 rpms. what i try to say is it does not feel linear.


my main question here is following what I have read on other posts..... should i go from 27.5 pilot to a 30 pilot?

or this means i should try  a 25 pilot?


#6
i have been restoring my rd400g for the last 5 years. finally i have it close to finish. THIS IS THE LINK ON MY PROJECT http://www.2strokeworld.net/forum/index.php?topic=71.0

i had my original side cover and cowl which I bought around 4 year ago.

Seeing the ridiculous prices this parts can reach on eBay, I decided to experiment with a fiberglass shop in replicating the original side covers and cowl on fiber glass and make them available to everybody, this are good for whoever is missing one or two or all of them, or if you want to protect your original ones like me, keep the originals stored and use this replicas for your daily driver, right now this parts and the cylinders are probably the must expensive and hard to find parts to replace on the bike. (pretty much everything is getting hard to find)

They look extremely good you can judge by the pictures, they came out on the outside just like the originals, they will need very little prep work to have them painted to your liking.

The finish is really good, the curbs are perfect just like the originals. The molds where made out of my originals, as you can see they had to be prepped in order to make the molds that's why they are grey.

Here are some pictures testing and fitting the parts, don't mind the weird color on the tank, I'll have everything painted soon with a set that I'll be keeping for myself, the originals will be kept in a vault in Switzerland in a few years they might be word a fortune if prices keep going trough the roof.

feel free to give me any feedback from what you can see.

i posted this same post on the for sale section, with pricing. wanted to post it here also because a lot more people get to see this on this section, if you want to see the pricing head over there here is the link http://www.2strokeworld.net/forum/index.php?topic=3692.0

PM me if you are interested, and post any questions you might have,.

IMG_9568 by manuel caicedo, on Flickr

IMG_9576 by manuel caicedo, on Flickr

IMG_9569 by manuel caicedo, on Flickr

IMG_9575 by manuel caicedo, on Flickr

▼Instead of making the lower tabs for the side covers in fiber which was a weak link, we came up with this solution which is a custom-made metal tab which we made on a lathe shaped like the original, this makes the piece stronger and will last as long as you don't drop the bike, they are as strong if not more than the originals.
IMG_6039 by manuel caicedo, on Flickr

▼This tab Is held by a countersunk screw from the front, this screw will be shipped loose, I advise to use blue Loctite, and fill with your preferred choice of filler, before priming and painting so it's not noticeable, also the little tiny imperfections you can see will be filled with primer or filler. those should disappear once they are  painted.
IMG_6026 by manuel caicedo, on Flickr

▼Oil tank side covers:
IMG_6025 by manuel caicedo, on Flickr

IMG_6034 by manuel caicedo, on Flickr

IMG_6033 by manuel caicedo, on Flickr

IMG_6032 by manuel caicedo, on Flickr


▼Right side cover:
IMG_6038 by manuel caicedo, on Flickr

IMG_6037 by manuel caicedo, on Flickr

IMG_6036 by manuel caicedo, on Flickr

IMG_6035 by manuel caicedo, on Flickr


▼Rear cowl: we replicated the lip under the seat with a two piece mold, and fits fine with the tool box
IMG_6031 by manuel caicedo, on Flickr

▼the spiderweb like texture on the bottom of the parts is natural for fiberglass, this can not be seen unless you remove the side covers or lift the seat. they could be also filled if you wanted to.
IMG_6028 by manuel caicedo, on Flickr

IMG_9583 by manuel caicedo, on Flickr

IMG_9582 by manuel caicedo, on Flickr

IMG_9571 by manuel caicedo, on Flickr

IMG_9570 by manuel caicedo, on Flickr
#7
Haus of Projects / Re: rd400g project story
July 30, 2021, 01:07:21 PM
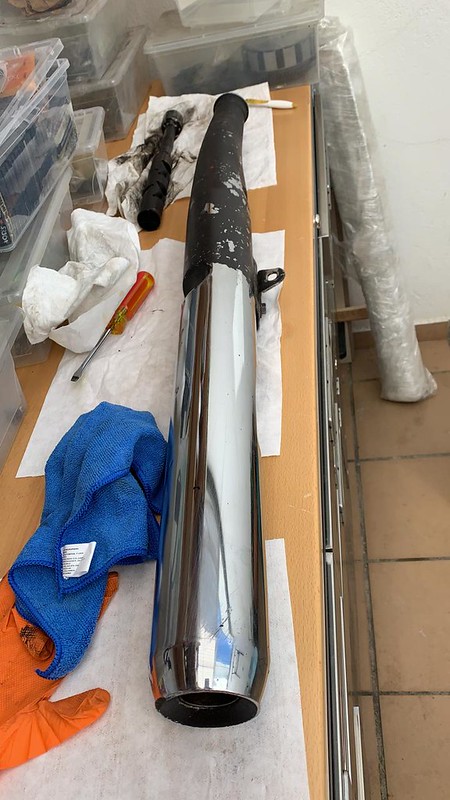
One of the things that i was not sure what to do about was the original exhausts.

i managed to get a hold of a set of used 2r9 pipes and headers from Canada.

they looked good but had been painted black , I had been looking for a shop that would rechromme them but finding a three stage chroming process here in Colombia (zinc, nickel, chrome)  that is needed for exhausts has been impossible.


exosto 1 by manuel caicedo, on Flickr
▲you can see the chromme on half the pipe i did yesterday.

they had been painted black, I got them around four year ago, so I had wrapped and stored them for that long, yesterday i took them out to remove the paint.

to my surprise the black paint appeared to have been applied on top of the chrome as a rust prevention method....

i used paint remover on the pipes and it came right off, did not even had to wait 10 seconds for the remover to act.

the original chrome below is not perfect, it has some dings here and there, but overall i think they look really good, and with some 0000 steel wool, and some sanding and polish i think i can recover the pipes and have them look really good.

This is a breath of fresh air, i had been thinking on getting expansion chamber in case i could no t find how to recover the chromme on the pipes.

I can fit them and ride the bike as it was intended with this pipes. in the future i might get chambers who knows. i do have to get an exhaust system for my cb750k this gives my wallet a little rest.


exosto 2 by manuel caicedo, on Flickr
▲as always chrome does look better on pictures, the resolution hides a lot of imperfections, but still they look great
#8
carb tuning is not my forte, i wish you guys could head me in the right direction.
wont know if my jetting is correct until i start the bike, but let me know if this might be ok for a street bike.

or what  should i change? or what sizes should i get to have in my hands when tuning, also what other information do you need from the bike?

Here is my setup:

rd400g: elevation 5200 feet above sea level

-stock 2r9 pipes

-stock airbox

-prox pistons.

-yz85 reeds with TSR yz85 spacers, removed material from the cylinders in order to fit them with a Dremel.

-rebuild 2r9 carbs with the dave f mod done by chuck Quenzler.
---Keyster 2.5 Needle valves
---27.5 pilot jets                                         
---5j6 needles, One if my 5j6 needles has the anodizing off in some parts of it, Chuck said i have to find a new one, I ordered a carb kit from Yambits which allegedly comes with the 5j6 needles, still waiting on them i have not had the chance to compare them. its been really hard to get a new 5j6 needle, so the yambits ones will have to do for now, might have to place both yambits ones if they turn to be slightly different from my original one.

-Squish band fixed by chuck Quenzler.

this is it....

hope any one can be a of help.


#9
Haus of Projects / Re: rd400g project story
July 27, 2021, 05:04:22 PM


Getting some work done on this machine.

I assembled the engine basing my built on the link from the uk´s aircooled forum.

https://www.aircooledrdclub.com/smf/index.php?topic=51430.0

he explains it very good, there are some minor things here and there that should have been explained better. but nothing a little bit of research won't do.

I honed the cylinders with a flexhone, really easy job using a milwaukee m12 drill. the cylinders went in fine, no special ring compressor needed.


IMG_4893 by manuel caicedo, on Flickr

IMG_4896 by manuel caicedo, on Flickr
All the electrics in place, the manuals do not explain the routing very well, but some common sense and everything fits nice.

IMG_4901 by manuel caicedo, on Flickr
Getting her ready for the carbs
#10
Haus of Projects / Re: rd400g project story
June 25, 2021, 12:06:07 PM
finally  got a rolling chassis.

my rear axle's threads where really messed up, found a perfect one on eBay, had to wait for it to get here.


rd400 20210625 02 by manuel caicedo, on Flickr

rd400 20210625 04 by manuel caicedo, on Flickr
▲Fitted the clocks, they are in excellent condition for their age.

rd400 20210625 01 by manuel caicedo, on Flickr
▲Had the calipers painted, i have another pair which have been powder coated, but these looked better. i rebuilt them using new seals and a new caliper piston.
The brake lines are old, but seem fine...  might get stainless steel ones from Hel or Venhill. I will finish the bike first since I'm not convinced with the handlebar, it's too short and  curved down, I don't think it's original. once i have the correct handlebar and the correct lengths for the brake lines i will have some custom made
What is the best replacement handlebar for this bike?


rd400 20210625 03 by manuel caicedo, on Flickr
▲rebuilt the front forks, new springs from progressive.

rd400 20210625 05 by manuel caicedo, on Flickr
▲Started the engine, since i have three engines I chose the best gears out of the three and rebuilt the whole tranny with new internal and external bearings.
#11
Haus of Projects / Re: rd400g project story
April 27, 2021, 05:39:03 PM

So its been a while  and other projects have taken my entire time and budget.

after the pandemic started i found a good non working but complete 1975 cb750k2. which is still ongoing.
also this january i got a honda tr200 fatcat.

those two bikes are still going projects but they are as of last week in working order.

i  just didn't have the space at home for working on three projects, i wanted to get those two out of the way since this rd is my first baby.

i have everything i need to rebuild it.

so first things first is getting  rolling chassis.

the frame had been covered in vynil for the last 3 years,  had forgotten how good it looks.


IMG_2941 by manuel caicedo, on Flickr
I rebuilt the wheels, had the shop paint them, brand new bearings and internals, new sprocket, new shocks from progressive, fitted the center stand.


#12
Quote from: SUPERTUNE on April 08, 2020, 07:58:53 AM
Grind, Grind, Grind away....you need more room for the reeds to breathe out the sides of the petals as EE replied!

Chuck


OK, with this quarantine and not being able to have a nanny for my 1.5 year old, means i dont have the time i would like for this project, but finally got some time to do this....

it was easier to grind, grind , grind everything away smoothly than how i was doing it before.

here you can see how they ended up.

my last question is:

should i sand it with a 80 grit sand paper to smooth them a little, going side to side not front to back?

or just leave them like that.
#13
Quote from: 85RZwade on April 04, 2020, 09:20:46 AM
Nice work. I suspect it's all about clearance for the petals to open fully, but I wouldn't be able to stop myself from smoothing those edges.

yes, they clear the sides by half a milimeter, here you can see the pics.

and this are the reed block spacers from chuck quenzler.

i will radius the sides and post more pictures of the finished cylinders
#14
Quote from: m in sc on April 03, 2020, 10:34:49 AM
id definitely radius them at least. Have you bolted them in and make sure the reed petals will clear when they are wide open not hitting the sides?

check the second picture, this are original yz85 reeds, they have reed stoppers.

i think the vforce ones are the ones that do not have them.

they clear inside, i have to use them with spacers
#15
Turning Wrenches / cylinders ground for yz85 reeds
April 03, 2020, 10:17:11 AM
ok guys, i removed enough material off the cylinders to fit the yz85 reeds.

i got the sacer from chuck quenzler

here are some pictures, is this fine just to leave them like that?

or should i smooth the corners so as they are rounder?