• Welcome to 2 STROKE WORLD .net.
 

News:


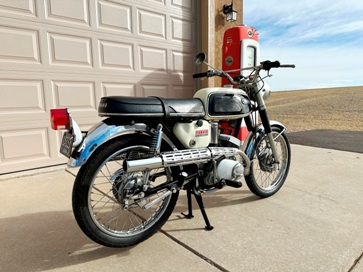
Rizingson's stunning YASC-1

Main Menu

Yamaha Refurbishment Project: 1968 YAS1C

Started by Rizingson, January 08, 2026, 04:42:32 PM

Previous topic - Next topic

0 Members and 1 Guest are viewing this topic.

Rizingson

Finally getting started on my YAS1C Scrambler. This example is the super rare "special edition" Yamaha provided for the best 200 dealership owners. Only one per dealer was available for this promotion. Unfortunately mine, which was given to a dealer in NYC was not exactly treated well and will need extensive work to bring it back to it's original luster. Motor shouldn't need a lot of work, as it shows only 698 miles on the working odometer. Another plus is it was only in New York for 1-2 years last registered in 1969 before the family moved it to the western slope of Colorado, so rust is very minimal. Will try to keep this build thread to a minimum as I typically take 100's of photo's.

Here it is on the lift to get started. The seat here is an NOS seat that I temporarily fitted after taking off the destroyed original.
IMG_8978.JPG

First step will be a complete dismantling of the the bike, as it will need serious clean-up that can't be achieved
while together. Here I've removed the front wheel. The sealed beam headlight was missing, so a replacement has been acquired.
IMG_8984.JPG

Here I've disconnected all electrical from the headlight bucket. Removed the bucket along with the forks and fork ears.
IMG_8992.JPG

Removal of the skid plate and foot rest assembly exposes a lot of mud and tar like substance this bike has been ridden through.
IMG_8994.JPG

Mufflers and heat shields are now removed. Decided to quit for the day before the rear wheel and motor are removed.
IMG_8998.JPG

Simmons1

Thanks for posting. This is going to be an awesome resurrection to watch.

BlueR32

Man, that brings back memories! I grew up in Dublin Ireland in the late 60's early 70's and the "Yassy" as we called it was the cool bike to have. Nice to see her being brought back to life  :clap:

SoCal250

Love those scrambler pipes! :bacon: I've always been a big fan of the high pipes on the early Yamahas.
Cool project. Looking forward to seeing the progress.
75 Yamaha RD125B   75 Yamaha RD125B (project)
75 Yamaha RD250B   75 Yamaha RD200B (project)
73 Yamaha RD350     77 Yamaha RD400D   79 Yamaha RD400F  
91 Yamaha TZR250R  89 Yamaha FZR400   05 Yamaha FZ6   
05 Yamaha XT225TC  82 Honda MB5  02 Aprilia RS250 Cup (sold)

Rizingson

#4
Took a couple weeks off, but finally spent a day on the YAS1C refurbishment project working on the front end.

Painted the fork ears and headlight bucket. Also installed speedometer with new indicator bulbs and replaced vibration gasket.
IMG_9012.JPG

Forks were dismantled, resealed and new boots installed. Since original boots were non-existent I found out that a Honda CT90 had the same dimensions as Yamaha YAS1C, with the exception of one additional rib, 13 instead of 12. Hope no one is picky enough to notice. LOL
IMG_9013.JPG

After forks were pulled up through the tripe tree the front fender was polished and also cleaned up on the inside, along with some rust prevention. Also installed a new tire on the wheel. Tire was replaced with the proper tread pattern and size. The tire that was on the bike at time of purchase was to large and incorrect pattern which rubbed the fender. New brakes were also installed.
IMG_9017.JPG

Headlight bucket installed and main wiring harness pulled through new grommet. Waiting on some more grommets for speedo cable and handle bar switches before closing up. Then called it a day!
IMG_9018.JPG


85RZwade

I post waayyy too much

Rizingson

Here's a continuation of the deep detailing on the '68  Yamaha YAS1C I've been working on whenever the weather warms up enough that I feel like working. Today I was focused on the dismantling of the rear of the bike.

Closed up the headlight bucket after confirming that all accessories and indicator lights were working. All done with the front forks, new tire etc.
p1.jpg

Getting started on the rear of the bike by removing wheel, followed by shocks, fender, tail light and swing arm.
p2.jpg

Rear view before removing oil tank, tool box and battery box plus a few more small items.
p3.jpg

Draining some old injection oil from the tank. It was too thick to drain this way, so ended up just removing the tank and dumping.
p4.jpg

Close to finishing the rear end dismantling.
p5.jpg

Now it's time to clean more frame and do touching up where needed.
p6.jpg

Simmons1

Great update! I love the details you provide of your progress

Rizingson

Time for another update on the rare Yamaha 125 YAS1C Scrambler. Last update was full dismantling of the rear half of the bike. Assembly has now gotten underway, but many more small details to be worked on later.

Cleanup on frame has been completed here and the swing arm back in place
p1.jpg

Rear fender installed after polish and inner side corrosion abatement.
p2.jpg

Taillight assembly back together installed and wiring tested.
p3.jpg

Rear shocks cleaned up and installed. Drive chain will be updated to a 428H from the standard 428 since clearance wasn't an issue with the wider heavy duty chain.
p4.jpg

Attention to detail as every nut and bolt gets cleaned and/or polished.
p6.jpg

Drive chain fitted and adjusted. Chain guard and foot pegs installed.
p7.jpg

Now it was time to get the carburetors ready to clean. Carburetors were in pretty decent shape. Float valves were stuck and one idle jet plugged but overall they were easy to clean. Picture shows as they were opened.
p8.jpg


Rizingson

Here's another quick update on the 1968 YAS1C 125 Yamaha Scrambler. Not much can be done when waiting on a couple header gaskets to arrive, except continue cleaning. Funny how a couple of small bits can hold up the progress. Getting anxious to finally take this thing out for a good shakedown ride. I do know the clutch plates are stuck, which is not surprising since it's been sitting since 1969.

First I wanted to get the air cleaners back in place. These canister type filters are unique and easily identified for the Yamaha 125 Twins, from '68 - '70. They are chrome plated and nearly allows badly rusted if you can even find them.
p1.jpg

Now it was time to install the mufflers after cleaning and polishing.
p2.jpg

The left muffler installed.
p3.jpg

If you don't want to get burned of course you'll need heat shields.
p4.jpg

Here's a straight on shot of the right side with mufflers system installed. I love all that chrome!!!
p5.jpg

Left side of bike exhaust system finished up. Getting down to just the battery cover, oil tank (waiting on sight glass) then the seat and fuel tank. The fuel tank will need rust removal so it will only be temporarily set on until spring as I need warm weather for the chemicals to work best.
p6.jpg

Short video of first running attempts. Without mufflers and with mufflers installed

RDryan

Wow, what a beautiful bikes. Lots of shiny parts :clap:  Now if those cannisters are rare especially in that kinda immaculate shape what would one due in substitution? They look like a couple of tall boys!  :cheers:

85RZwade

I post waayyy too much

Rizingson

So close: Wrapping up the '68 Yamaha YAS1C "Special Edition" refurbishment. Put on the side covers, tank and seat. This leaves only new fuel lines, new petcock, mirrors and bleeding out the injection pump lines and filling with new oil. Took lots of pictures today, hope to get it out side for better shots later (maybe tomorrow as it's supposed to be a nice day.)

Left side battery cover in place.
p1.jpg

Right side injection oil tank on with new decal, fill cap and sight glass!
p2.jpg

Fuel tank set on and bolted down. New tank badges were also installed.
p3.jpg

Another pic of the fuel tank.
p4.jpg

Top of tank. Clear coat removed, color sanded to even it out and clear coat reapplied. That procedure was also done to the side cover and oil tank.
p5.jpg

Left side of tank and NOS seat now installed.
p6.jpg

Seat in place.
p7.jpg

Front view looking down.
p8.jpg

mnein

That's awesome. An NOS seat? Where the heck did you get that?