• Welcome to 2 STROKE WORLD .net.
 

News:

MSRs 78 400 , My hybrid and a random German tractor


Main Menu

Yamaha YA-1 Resurrection

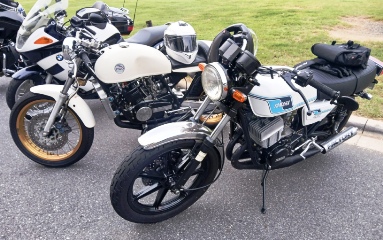
Started by Yamanatic, May 10, 2024, 11:52:49 AM

Previous topic - Next topic

0 Members and 1 Guest are viewing this topic.

Yamanatic

Wow, only 1 Year since the YA-1 got dragged out of the corner! Going back to last year's comments, I did sign up to get one of the 'Soft Parts Kits' offered through Communications Plaza Yamaha Japan, and amazingly was one of the first 5 (they only produced 5 additional kits) requests, but when they contacted me to make the deal, the first question was my location; so much for that - the bike and owner had to be in Japan and Japan only, no where else, period =(. Oh well, I tried.

Since the RD350 project is finally done, I restarted the YA-1 resto in earnest, and have reduced the entire bike to a parts-book quality exploded diagram. I saved the wheels for last, knowing the spokes would be a nightmare; most everything has to be reused since just about everything is unique to the bike and there is no 'superseded,' to it. Also a true historical restoration favors marginal original to pristine replacement - getting the bike apart without destructive removals is crucial.

The front wheel took 2 full days to nurse apart, and today is day three on the rear with 12 spokes left. Thought I'd pass along a little insight on how to remove badly rusted stuck spokes; someday in the distant future there is a good chance a 2SW member may face the same challenge restoring a 70 year old RD or something.

First thing was to mop the business end of the spokes down with Liquid Wrench (actually PB-Blaster) a half a dozen times over a week or two to free things up. A good wheel stand and a bar stool helps. Buy a couple of the best full nipple-width spoke wrenches you can; a short one and a long one if possible. Add good tunes and a pinch of Indica PRN(as needed)! 


Verify that the nipple squares have not been brutalized first, then give it a try. If the nipple doesn't move at all, the nipple has corroded to the rim; I have a small brass hammer to firmly tap the nipple from both sides a few times, and if really stuck give the screwdriver end of the nipple light angular hits with a fine drift - just stay away from the end of the spoke area. 

The tricky part now is to not torsion-break the spoke; at this point it doesn't matter which way it breaks loose; hearing that 'pop' is music to the ear. I start with about a 20-degree twist back and forth, and stop at 30-degrees. More penetrating oil, and sometimes hitting the end of the spoke wrench holding tension will do it; worst case a little heat sometimes help.

I find that 45-degrees is about the limit of twist before the spoke breaks. If and when it finally comes loose, even just tiny bit, start working the nipple back and forth further and further until the threads free up - it might only take a few back and forths or 20 times, but it will loosen; this step saves fighting the nipple all the way off.

The last 12 spokes have been successfully removed - all the spokes and nipples are salvageable; all 72 came loose!

Warren
Of Course It's Gonna Make Some Noise - There's GAS Exploding In There!

Yamanatic

OK, Enough with the spokes - must be time for some fun stuff; motor work! Solving Nipponese motor puzzles is better than a night at the movies. There is nothing on the intricacies of YA-1's assembly beyond history and color, but, they are very close to an exact copy of the '49 to '57 DKW RT125, probably the most duplicated motor ever - the BSA Bantam, Russian Minsk, Polish Sokol and SHL, Harley Hummer, and of course, the Yamaha YA-1. Lots of DKW vids and the only obvious difference inside the cases is the shifter mechanism design.

First, the gearbox. The 4-speed transmission is a marvel of simplicity; the mainshaft carries the clutch on one end, and the drive sprocket on the other. The countershaft is more an idler shaft that handles the gear reductions. The shift mechanism is a bit of a mousetrap but well made, similar to the mechanism used in YDS motors but fully contained inside the cases. Luckily everything inside was in excellent++ condition including the bearings and bushings.

The gear and roller bearing sitting in the crankcase goes on the drive end of the main-shaft, then the drive sprocket mounts on the splines. Can't see the gears very well so it was moved aside for pics. That arrangement mounts to the left case prior to assembly. A couple of the lipped seals (especially the drive sprocket shaft) ended up being obsolete, but eBay pulled through - a European seller had one and only one, and it should be here by next week.   

No Phillips-head screws in the entire motor; all Cheese-head with straight slots. Star washers go under all the case screws. The cases are Yamabonded together with no gasket.


Of Course It's Gonna Make Some Noise - There's GAS Exploding In There!

Yamanatic

Speaking of Crankshafts...

After hitting the International market to source the rather unique engine oil seals (India and China), I'm finally down to installing the crank and closing the cases. Going by both the parts book and the way the motor came apart, there are 0.012" thick, bearing-OD diameter flat shim-washers that go between the outer flywheels and the mains. With the washers installed, they basically turn the mains into partially sealed bearings (they fit the bearing faces flush - see pics).

The only oil supply to the bearings would be through the feed holes at the base of the transfers. Yamaha could have intended the washers act as oil retainers, but it wouldn't seem enough oil would pool there in the first place. Given that Yamaha didn't continue using the full-coverage washers on future 2T cranks, I decided to take 6mm off the washer radiuses, thereby exposing the races.
Note: The removed bearings were nasty dirty but functional.

Even though this engine is a direct copy of an RT-125 DKW, Yamaha's fingerprints are all over it, and some of the evolution/development of future engines is apparent. One thing noticed was the un-characteristically minimal crankcase volume; besides the 8mm's between flywheels, there is only 0.013" clearance on either side of the crank and 0.10" difference radially - almost like they didn't want the crankcase to contribute to charge volume. IMO, the mains need as much exposure to circulating pre-mix as possible given the space.

Here are the 'before' pics:
<img src="https://i.imgur.com/jRB922M.jpg" title="source: imgur.com" />
<img src="https://i.imgur.com/3f4lGw5.jpg" title="source: imgur.com" />

Considering the bike will only see a few hundred miles (maybe), the purist in me says leave everything 100% stock and original as possible - I digress...

Warren
Of Course It's Gonna Make Some Noise - There's GAS Exploding In There!

m in sc

that's interesting. the triples would oil in the sane way with 'slingers' and def held in the sludge. it also made premixing on the h1s kind of a no go w out modding the crank